NOTE: THIS ARTICLE HAS BEEN MOVED TO MY ENGLISH BLOG, PLEASE REFER TO THAT FOR THE LATEST UPDATES.
A friend of mine and I host a weekly podcast and, as it often happens, we speak with our guests via Skype. For a while we had everyone record his own audio, since we wanted to have a separate track for each person in order to get the best possible audio quality. But that was inconvenient, both for our guest and for us, as we had to wait everyone to send us his audio before mixing and editing the episode. Recording Skype’s group call in a conventional way wasn’t a better solution. We’d only have two separate tracks: mine and everybody else’s, This is fine if there is only one person other than me, but it’s not with more guests.
So I started to think on possible solutions, and the best one that came to my mind was to have a separate instance of Skype running for each guest (I’ll explain how to do this later on) and use Ableton Live to record each track and to manage the audio routing.

To manage the audio, we need some sort of virtual audio cables to connect Skype to Ableton Live. The best tool is SoundFlower, so head over to their site, download and install it. However, it is not ready for our purpose right out of the box: we need 2 “virtual audio cables” for each Skype instance, and Soundflower only ships with 2 of them enabled by default (and only one of which, the 2 channel one, is suited for our needs). I managed to edit Soundflower’s plist file to get more.
I created an edited DMG which installs my mod. To use it remove any previous versions you might have installed (use the uninstaller contained in the offical DMG, then reboot your Mac), download mine, and install as you would normally.
If you prefer to do things manually, here’s what you have to do:
- Download my modified Info.plist (which is configured to create 9 virtual audio cables, you can add more following the mini-guide at the end of this post)
- Open the Terminal (which is located in /Applications/Utilities), and execute this command twice:
sudo kextunload /System/Library/Extensions/Soundflower.kext
You’ll have to enter your user password (note that you have to use an administrator account to be able to run commands with sudo) - Go to /System/Library/Extensions/
- Right click on Soundflower.kext and select “Show Package Contents”
- Drag my Info.plist into the “Contents” folder you see in the package, and replace the existing file. The finder will prompt for you password.
- Run these commands:
sudo chown root:wheel /System/Library/Extensions/Soundflower.kext/Contents/Info.plist

sudo chmod 755 /System/Library/Extensions/Soundflower.kext/Contents/Info.plist

sudo kextload /System/Library/Extensions/Soundflower.kext
The next step is to get multiple Skype instances running at the same time. You can’t just copy Skype.app somewhere else and run it: it complains that there’s already another Skype running and it won’t start. To do the trick you have to run Skype’s executable as a different user on the same machine, so you need as many users available as the number of guests you wish to have. Head over to System Preferences, Users & Groups, if necessary unlock the preference pane by clicking on the lock in the bottom left corner, click on the plus sign and add as many users as needed. If you already have enough users on your Mac, you can skip this step.

You’ll also have to create a different Skype user for each guest, since everybody will be in his separate call. I won’t bother to explain how to do this, since it’s pretty straightforward.
Once you have enough users on you Mac, it’s time to start each Skype instance. To do so, open the Terminal and run this command:
su youruser -c '/Applications/Skype.app/Contents/MacOS/Skype'
Replace “youruser” with the username you chose, and press enter. You’ll have to enter the user’s password, and login to his Skype account.
Repeat this step for each Skype instance you need, you can do so by creating a new tab in you terminal (Command+T) and running the same command again, changing only the username.
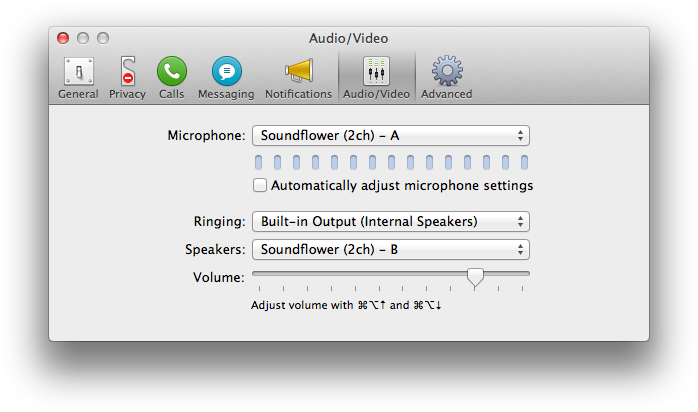
Next up, we have to configure each Skype instance to use Soundflower as its sound interface, more specifically one as input and a second one as output, hence the need for 2 Soundflower cables for each Skype. To do so, open the first Skype’s prefences, go to the Audio/Video section and set “Soundflower (2ch) – A” as microphone (i.e. the input sound card) and “Soundflower (2ch) – B” as the output. Also make sure that “Automatically adjust microphone settings” is deselected. Do the same in every Skype, but NEVER use the same Soundflower twice: the second Skype will use C and D, the third E and F, and so on. Don’t even bother to try Skype’s test call, it won’t work without some more steps.
Now that we configured the Skype side, we have to prepare everything for Ableton Live: it needs a sound card with many inputs and outputs to route them, but each of our Soundflower cables is a sound card of its own in OS X’s eyes. So go ahead and open Audio/MIDI Setup, which you can find in /Applications/Utilities/ or through a quick Spotlight search. In its Audio window, click on the plus sign in the bottom left corner and select “Create Aggregate Device”.

You can rename the audio device if you wish to. I chose the name EasyApple, the name of my podcast. The next step is to select which sound cards will be added to the aggregate device. Be careful to follow the right order when you select them, otherwise things could become messy in Ableton Live. First select your microphone input, your headphones output, then all of your Soundflower sound cards (from A to I, if you used my plist or DMG). Your aggregate device will now have bunch of inputs and outputs, and all of them will be used.

Now fire up Ableton Live, open its preferences and select the audio tab. Select your newly created aggregate audio device both for input and output, then open the input settings and set them as in the following screenshot.

In this window we can configure which of the inputs are available in Ableton Live. We can choose if we want each stereo input to appear as a single stereo input or two separate mono inputs, one for each channel. I suggest to use split mono inputs as shown in the screenshot, because some USB microphones, while presenting to the system a stereo audio interface, actually send the audio only to one channel, usually the left one. This way we can always choose the correct channel.
You might be wondering why some inputs are not enabled. Soundflower sound cards (or “virtual audio cables”) do only one thing: send whatever comes into their inputs to their outputs. So we are only selecting those channels that are used as “Speakers” in Skype as our inputs (i.e. Soundflower B, D, F, H), plus our own microphone. Summing up, inputs 1/2 is our microphone, 5/6 is Soundflower B, 9/10 is Soundflower D, and so on.
Do the same with the output settings, using this screenshot for reference

Again, we only enable certain outputs: you never want to send your audio to a Soundflower instance that you are also using as an input, as it would create a dangerous feedback loop. This time we can safely chose the grouped stereo outputs: 1/2 is for our headphones, 3/4 is Soundflower A (which is set as the microphone input in the first Skype instance), 7/8 is Soundflower C, and so on.
Here comes the fun part, we have to create our virtual mixer in Ableton. First, get rid of the MIDI track that that is present by default: just click on its name on the top and hit the backspace key.
If it’s not already activated, click on the IO icon on the right side of the window, just below the scrollbar.
We already have one track, which we’ll use for our microphone, but we need more of them, so add as many of them as there are Skype instances (plus the one we already have for the microphone) by pressing Command+T.
It’s a good idea to rename each track: click on the first one, press Command+R and type Mic, as well use this one for our microphone. Do the same for the other tracks, and name them â€Skype AB/CD/EF/GH†or whatever you find appropriate. For example, if you always call the same person with the same Skype instance you might want to name the track after the called person, but that’s totally up to you.
The inputs are almost ready, but we also need a few outputs to feed back the audio to Skype. This is done through the so-called Return Tracks, the ones on the right side next to the master. There should already be two of them by default, add more of them by clicking on “Create/Add Return Track” on the menu bar (or press Command+Option+T) and match the number of Skype instances you have running. Rename them in the same way you renamed the input tracks. The usual “Skype AB/CD/EF/GH” will do just fine.
In the IO section of Live’s mixer, you have to change the Audio From setting of each input track to “Ext In”. Select channel 1 as the input for your microphone track (you can verify that you selected the right channel looking at the VU meters as you speak into the microphone), and click on the In button in the Monitor section below the dropdown channel selection menu.
Do the same for the Skype tracks, selecting channels in this order:Â 5, 9, 13, 17.

In the IO section of each return track select “Ext Out” in the Audio To (which defaults to master) drop down menu, then select the output channels in this order: 3/4, 7/8, 11/12, 15/16.

We’ll use these send tracks to send to each Skype what it needs: everyone but himself, to avoid feedback loops. To do so turn all the send knobs under each input channel all the way up for your microphone channel, so that everyone can hear you. In the Skype input channels turn up all the knobs BUT the one for its output: for Skype 1 you’ll have to turn up all but the first knobs, in Skype 2 all but the second, and so on.

We’re almost done, the only missing part is our headphones: select channel 1/2 as the cue output (in the master track), then click on the Solo button that is on the left of the Master volume fader, and it will toggle to Cue. Now click while holding the Command key on the little headphone buttons under each input track you wish to listen to while recording. As the master output, select channel 15/16, which is our last Soundflower instance (“Soundflower (2ch) – I”, if you’re using my plist or DMG). You can now use this sound card as the input of every application you need to feed with the complete output of your conversation. I use it to have a backup recording in Audacity, in the unlikely event that Ableton crashes, and as Nicecast’s input to stream our podcast live.
Now the last part: click on the record button under each input track while holding the Command key.

Just press the record button on Live’s top bar and you’re done: you’re (hopefully) routing the audio in the right way while also recording each person in its own track. You can also take advantage of Live’s effects to process your inputs in realtime while preserving the original audio for further editing once the recording has ended.
Additional tips
Adding more Soundflower instances
Sometimes you will need even more Soundflower instances, not necessarily for the purpose of recording a podcast. To do so you just have to edit the Info.plist file you find in /System/Library/Extensions/Soundflower.kext/Contents/
To be able to edit it, first unload Soundflower by running this command twice:
sudo kextunload /System/Library/Extensions/Soundflower.kext
Since this Info.plist is a system file, you will not be able to edit it in a regular editor such as TextEdit, but you would have to use the terminal. To avoid this unnecessary complexity just copy it to the Desktop (to get it, navigate to /System/Library/Extensions/, right click on Soundflower.kext and select “Show Package Contents”: you’ll find Info.plist inside the Content folder). Open your copy of Info.plist and look for a section like this:
<dict>
	<key>BlockSize</key>
	<integer>8192</integer>
	<key>Description</key>
	<string>Soundflower (2ch)</string>
	<key>Formats</key>
	<array>
		<dict>
			<key>IOAudioStreamAlignment</key>
			<integer>1</integer>
			<key>IOAudioStreamBitDepth</key>
			<integer>32</integer>
			<key>IOAudioStreamBitWidth</key>
			<integer>32</integer>
			<key>IOAudioStreamByteOrder</key>
			<integer>0</integer>
			<key>IOAudioStreamDriverTag</key>
			<integer>0</integer>
			<key>IOAudioStreamIsMixable</key>
			<integer>1</integer>
			<key>IOAudioStreamNumChannels</key>
			<integer>2</integer>
			<key>IOAudioStreamNumericRepresentation</key>
			<integer>1936289396</integer>
			<key>IOAudioStreamSampleFormat</key>
			<integer>1819304813</integer>
		</dict>
	</array>
	<key>NumBlocks</key>
	<integer>2</integer>
	<key>NumStreams</key>
	<integer>1</integer>
	<key>SampleRates</key>
	<array>
		<integer>44100</integer>
		<integer>48000</integer>
		<integer>88200</integer>
		<integer>96000</integer>
		<integer>176400</integer>
		<integer>192000</integer>
	</array>
</dict>
Just make as many copies of this section just below it, changing ONLY its name (see the bold part above).
Now save the file and drag your edited copy back into its place. You’ll have to authenticate and provide your password. At this point we need to restore the proper file permissions and load Soundflower:
sudo chown root:wheel /System/Library/Extensions/Soundflower.kext/Contents/Info.plist
sudo chmod 755 /System/Library/Extensions/Soundflower.kext/Contents/Info.plist
sudo kextload /System/Library/Extensions/Soundflower.kext
Skype port forwarding
Skype is a great tool, and part of its success is due to its ease of use: it needs pretty much zero configuration.  Our regular home network environments are not ideal for it, though: we are almost always behind a NAT router, and we cannot connect directly to the person we’re calling, so Skype is forced to route our conversation through a third party (one of their servers, most of the time). While this is fine from a security standpoint (Skype calls are well encrypted), it is not good for latency or potential packet loss. To avoid this unnecessary routing, just forward a port of your choice for each Skype instance you will be running and set it in the Advanced tab of Skype’s preferences.

Add a Jingle track
Since we’re already using Ableton Live, why not add some jingles ready to be played as needed? While this is not a necessary step since we’d be editing our podcast afterwards, it could be a good enhancement for live-streamed episodes. To do so, just add another track (Command+T), turn all its Send knobs all the way up (unless you don’t want some of your guests to hear these sounds) and drag your audio files into any available slot in the track. You’ll also have to Command-click the little headphone button to be able to listen yourself to what you play in this track.
Useful Ableton effects
Ableton Live is a powerful tool, so you might want to add some effects into each track. Popular choices will be a compressor and a limiter. Look for the audio effects section in the left column, pick an effect and drag it over to the track you want to add it to. Refer to the dozens of tutorials about Live and its effects you can find online (YouTube is a great resource for this) to tweak your setup.
Edited 20/12/2012
I’ve now updated my package with the latest version of Soundflower (1.6.6b) and edited it slightly as DoctorMikeReddy suggested to restore Soundflowerbed compatibility.
27 risposte su “Record multi-track Skype group call on OS X”
[…] Interested in learning more? Follow LuBlog’s detailed instructions. […]
[…] Record multi-track Skype group call on OS X […]
[…] Record multi-track Skype group call on OS X […]
Thank you for the writeup, I was frustrated with the lack of a separate track for recording skype conversations between multiple other people – this information allowed me to create a setup that will work for me and allow separate audio for each guest.
I tried this, but I do not see the new virtual audio lines. Am using 64ch v 1.6.6 and OS 10.7. Any idea why editing the Info.plist did not work?
Have you tried my pre-modified package?
I uninstalled then installed again, and rebooted and now I can see the extra 2ch virtual leads. However, Soundflowerbed shows Soundflower not installed error. Is there any chance you could update your mod for 1.6.6b as this fixes some bugs for OS 10.7.5
I still have no idea why the manual mod I did on Info.plist didn’t work for 1.6.6b but it is 64ch now, as 16ch is no longer available.
Unfortunately the SoundFlowerBed has that issue with this kind of mod, either manual or through my package, that should be addressed by the developer.
I will update the mode for 1.6.6b ASAP.
There’s something wrong with the instructions for editing Info.plist
I tried to reduce the number of virtual channels in your modded version, and I still see the same number as originally installed. Something is preventing the new Info.plist from being recognised. Any ideas?
Got it recognising the Info.plist changes by following this:
sudo -s
sudo chown -R root:wheel /System/Library/Extensions/[NAME].kext
sudo chmod -R 755 /System/Library/Extensions/[NAME].kext
NOTE: we have to change the ownership, etc, of the kext as well as the Info.plist
Force rebuilding of the kexts by:
kextcache -a i386 -K /mach_kernel -m /System/Library/Extensions.mkext /System/Library/Extensions
Loading kext files on the fly:
sudo -s
kextload -v [NAME].kext
Info from:
http://osx86.wikidot.com/en:how-to-s#toc1
All this fixes Soundflowerbed as well!!!!
I’ll try reproducing this for 1.6.6b when I have time.
P.S. I added Soundflower (2ch) above the lettered ones, which is what fixed Soundflowerbed I believe.
I updated my package to 1.6.6b and followed your trick to restore compatibility with Soundflowerbed, you can find it here.
Thank you for your help!
Does each caller on Skype call you on your SINGLE account?
Do you need a separate Skype account for each instance of the app open on each user?
You need a separate account for each instance, if you try to login with an account which is already in use you get logged out from the previous instance of Skype.
HI Luca,
interesting concept. And I think the only one that works with multiple remote speakers to seperate them to different tracks.
I know a similar concept with Mumble. Where all remote speakers and all local Mumble instances are in the same room and every local Mumble instance mutes all but one remote speaker different to the other instances.
In this scenario I understand how the remote speakers can hear each other, because they are in the same room.
In youre concept I understand that each of the local skype instance call one of the remote speakers. I really did not get the point how the remote speakers can hear each other. Maybe you can explain this in the article.
Are the B,D,F,H Channels for reflecting the audio from a remote speakers to each other?
Kind regards,
Tim
Hi Tim,
basically here I use Ableton Live as an audio mixer, and specifically I use it to realize the so-called mix-minus: every caller can hear everybody else’s audio but not his own, in order to avoid annoying echoes.
So yes, B,D,F feed audio back to their “ownersâ€.
I tried to draw a scheme for you, it’s pretty messy but I hope you get the idea http://cl.ly/RpAI
Hi Luca,
thanks for the explanation and the scheme.
I got it now.
Kind regards,
Tim
I’m not as technically savy as many people might be..do you have a video explaining the process…I’m a “seer” and reader and it helps to have a visual with all this.
I made a video, I hope it’s decent enough: English is not my main language and I recorded it on the fly without preparing first…
http://youtu.be/jRX-TL8TDBg
Luca- This is really good stuff. I have been trying to get my audio to work in BOINXtv so I could broadcast with multiple channels and I think you nailed it. Thanks for the great insight and the video is very helpful!
this is amazing. thanks for documenting it. now on our podcast (ten junk miles) we can skype multiple remote peeps at once!
I’m glad it helped!
Brilliant, man.
I’ve been banging away at trying to sort this out with all kinds of different combinations of hardware and software, and this – so far, anyway; I haven’t gotten a chance to fully test it yet – seems to be the most streamlined and elegant solution.
The real breakthrough for me was running multiple instances of skype – super slick!
The only thing that threw me for a bit was the way the Aggregate Device handled routing audio to/from my USB audio interface (which has 2 ins and 2 outs of its own).
Because they’re not labeled explicitly in Ableton (just the numbered pairs), I had to do some trial and error to get it working.
But thanks again!
Feel free to check out our show if you’re interested in Photography 😉
??????? ???? ????? ?????????? ??? ??????????
[…]you make blogging glance[…]
health conditions
[…]you make blogging glance[…]
health conditions
[…]Excellent blog here! Also your site so much up fast![…]